The WRT has moved. If you're looking for info, entries or anything else bikepacking related try Bear Bones Bikepacking, the Bear Bones blog or the Bear Bones forum - ta.

Yea, yea, yea, but what is it?

The WRT is a 3 day and perhaps more importantly 2 night ride through and around mid Wales. You'll be expected to be self sufficient, carrying everything you need and sleeping out in or under whatever you think best. It's not elitist, entry is open to anyone who wants to try it. All the money raised by the WRT goes to the Wales Air Ambulance charity ... an organisation I hope you'll never need.

Sunday, February 27, 2011

Breaking news just in!

It would appear that the poly tarp experiment is over. First reports point towards a frontal collapse, possibly due to fatigue. Obviously a full investigation will need to be carried out before we can be certain of the chain of events that led to today's disaster. Eye witness reports indicate that no one was injured in the catastrophe, although rescuers are still searching the remains for 2 squirrels who are as yet unaccounted for.


The devastating devastation from today's devastating disaster!!!!

Yori Plas from the farm down the lane, witnessed today's events and had this to say, "We've had some rain and some wind but the thing had been fine for 4 days, what happened today was a total surprise".

More news as we get it from the disaster scene!

Pauls bracket.

Actually it's not Pauls, it's mine. This lovely little bracket is however made by Pauls Components in the good old US of A. It takes the place of your normal headset top cap and allows you to fit stuff that would otherwise be cluttering your bars ... lights, GPS, computer, etc.


If you use a handlebar harness to hold your kit then the bracket is fantastic. I've always found that if I have a harness fitted (to the bike, not me) and put a light on the bars, the 2 things interfere with each other. Fitting a light to the bracket raises it out of the way and keeps it central on the bike, so a win win really. They're available in black if you don't like silver and come with a nice new stainless centre bolt. I haven't seen them available over here yet but it's easy enough to order one on line. This one came from Aspire Velo Tech http://www.aspirevelotech.com/Merchant2/merchant.mvc?Screen=CTGY&Category_Code=PAUL_STEM-CAP-MOUNTS and cost $28 plus a couple of quid shipping ... worth it for the very exclusive, Pauls sticker it comes with!


Friday, February 25, 2011

WRT 2011 ... One month left to enter!


Just a reminder folks, you've now got just over a month to get yourself entered for this years WRT. If you've already got an entry form then crack on, if you haven't but would like one, email me stuart@forestfreeride.co.uk and I'll sort you out.

Everything's swinging along nicely this end. The grid references are taking shape, raffle prizes are starting to come in and the 2011 logo has been sorted. I've also booked 3 full days of sun for the proceedings and you wouldn't want to miss that would you?

Thursday, February 24, 2011

Danger of suffocation!

We all know that the whole lightweight thing can get pretty expensive, once you get bitten by the bug it can be hard to stop. If the bug has bitten, then spending large sums of money on something to save a bit of weight or because it packs smaller makes perfect sense! However, if the bikepacking bug is still to infect you but you'd quite like a dabble, the potential expense can be off putting ... in our quest to bring bikepacking to the masses we've already looked at ultra cheap and ultra light stoves, so now I give you the polythene tarp. Once again lightweight and much cheapness team up to bring you something which may or may not work.


A trip to the builders merchants to buy 2 polythene dust sheets was a little too successful and instead of returning with the 2 single dust sheets ... I returned with a 50m roll of polythene, which I'm sure will come in handy. For anybody who lives near 'normal' shops I'm assured that a 3m x 3m sheet will cost you around £2.50. I knew that the thing would have to be put together as simply as possible and the simplest method of attaching the guy lines was by using pebbles. A few minutes splashing about in the river resulted in wet feet and 8 small round pebbles. I'm hoping that 3 guy lines on each side (plus the 2 ridge lines) will suffice but there's nothing stopping you adding more if you want. I wrapped each pebble in the polythene a couple of times then gave them a twist (bit like a boiled sweet wrapper) before tying a piece of string around them. Just to be on the safe side I also gave each one a couple of wraps of duct tape ... we now had some guy line points.


A handy tree and a stick provided the points at each end to tie the ridge lines to and there you go, a poly tarp. I set it fairly low to the ground to help minimise any sail effect but this may be at the cost of water collecting on the flatter roof but we'll see. There's enough room in there for 2 plus gear or possibly 3 at a push. I've really no idea how well it'll stand up to the Welsh weather (or any weather) so I'm going to leave it erected and see what happens.


I haven't got any scales that'll weigh it, so let's just say that it weighs next to nothing ... it's the lightest 'tarp' I've ever picked up. If you don't carry the pebbles about then obviously it weighs even less. As for pack size, you can easily fold it up and put it in a normal jacket pocket. Is it worth bothering with? Don't know yet, we'll find out but for what it costs and weighs, it must be worth a go.

Bear spotted in Wales!

Sorry, that should say Bear Paw not Bear ... anyway. Living in the UK as most of us do it's easy to get slightly blinkered. As an example when you see or use the word shelter it tends to imply, sheltering from the weather, so rain, wind, cold and snow, etc. I think that at certain times of the year there are things to shelter from that are much, much worse than the British weather ... things that bite!

Midges are a curse, it seems that the nicer the place the more midges there'll be ... a kind of natural karma at work I suppose. The forests of Wales have their fair share of biting critters and at times it can be enough to make you leave the bivvy bag at home and pack a tent instead. That's a real shame though ... you're missing out on the best bivvy weather to be couped up inside a tent, just doesn't seem right, karma or no Karma! For me the solution is this.


It's made by a company in the States called, Bearpaw Wilderness Designs. They make all kinds of lightweight tents and shelters (inc' Cuben fibre stuff). This is the inner from their Pyro tent but can be used as a stand alone item. The ground sheet is sil nylon and the rest is very fine noseeum mesh ... so it keeps the nasty's out. You can either, string it from a tree branch, use a pole or stick or hang it inside a tarp. There's a nice big J shaped zip up entry (you can choose which side you'd like it on) and seven
pegging / tie points around the base.


This one is slightly different from the standard production model, I've had the height of the back and sides increased by 12" to keep any draughts out. That's one of the great things about Bearpaw, they'll happily custom make or alter designs to suit ... it's only your imagination which limits what they'll do. You might also have a pleasant surprise when you find out how much alterations and custom work costs. I won't quote weight / pack size with it not been standard but lets just say it weighs nothing and packs down to the same.

If you're on the look out for something to keep you from being eaten alive or even something to keep the weather off then pop over to http://www.bearpawwd.com/index.html and take a look.

Tuesday, February 22, 2011

If you ride all year ...

Winter's a time for the hardcore, a time for those who can't or won't wait till spring. The misery and suffering won't kill you but it'll toughen you up and hone you down, so when the snow, wind and ice go you'll be ready ... sounds great doesn't it? and those clear, crisp and sunny days are but the rain, cold and wind isn't quite so nice. I've enjoyed riding through this winter more than ever before. Even though there was snow (lots of deep snow) and the coldest temperatures ever recorded since the last time they told us the same thing, I enjoyed myself ... why did I enjoy myself? I'll tell you why, because for the first time ever, I could finish a ride and still feel my fingers, my hands weren't soaking wet, nor had my gloves tried to freeze themselves to my grips ... I didn't have to endure the usual winter misery because I discovered Bar Mitts!

Bar Mitts are like gloves for your handlebars. Your hands go inside where you can still do whatever needs doing, change gear, brake, etc but the nasty outside elements can't get to you.They're made from Neoprene (to a very high standard) there's a small zip and velcro loop for your bars to pass through and on the other end (inside) there's a simple sleeve with a velcro adjuster that fits over the end of your grip ... so, as you can imagine fitting is a straight forward job of around 3 minutes. Once on they're very secure and obviously the fitting makes them universal too.


You could be forgiven for thinking that they might somehow interfere with your riding or perhaps you might get your hand stuck inside in an emergency ... these fears are unfounded. You only notice them because your hands aren't in pain! The first outing I had with them convinced me of their worth. My hands really don't like the cold, swollen joints, split skin and fingers much larger than they ought to be. So a ride in temperatures down towards minus 10 would usually involve the biggest, thickest pair of gloves I can find. With the Mitts fitted I chose to wear my lightest summer gloves (that could have been a really bad idea) ... the outcome was, warm and dry hands. At one point, on a long climb I even took my gloves off!

If you think, great idea but are a little worried about what the cycle fashion police might say, then if were honest, you don't really ride in winter do you? If on the other hand you think, great idea, I'll get some in September, my advice would be ... get some now. I can see these being on everyone's list and once the first signs of winter appear they'll be sold out ... remember, book early!

Monday, February 21, 2011

Not that I need much excuse!

Anyone who's ever visited the Forest Freeride inner sanctum, or workshop as certain people refer to it, can't help but have noticed the number of bikes. The natural assumption is that the majority are hire bikes, that assumption is, I'm afraid, quite wrong ... 70% of the bikes are mine. It would seem that I really don't need much of an excuse to build a bike. A pair of handlebars or saddle might be all it takes to set me off on yet another build.

However, I feel slightly more justified with this. I'm 40 this year and the birthday fairies won't be bringing me a new Indy Fab but a 40th does deserve something a little special ... doesn't it? I'm like most people with too many bikes, each bike has a specific role. There's the PA I use for instructing, the Alpine I use for guiding, the SS Cyclo Cross bike for winter, downhill bike, SS monster crosser, 69er, etc, etc it's seemingly endless. One thing I haven't got though is a specific bikepacking/multi day bike (actually I have but I could always sell it). Combine 40th birthday with 'not having one' and you have the perfect excuse to build it, right?

All the bikes I've ridden on past trips have served the purpose but each one has been a compromise. Overcoming each bikes shortcomings has enabled me to forge a pretty good idea of what I want from a bike built to cover long distances, off road, while carrying my gear. You can see my starting point in the picture below. Over the next few weeks it'll get built up into what I'm hoping will be MY ideal bikepacking bike. I'll keep you posted and try to explain my choices and decisions as it progresses. I've a maiden voyage planned to celebrate my birthday, so fingers crossed eh.


Colour blindness has its advantages!

Sunday, February 20, 2011

Help for tarpists!

I like tarps, I like the flexibility they offer over most other types of shelter. However, when the winds whistling through the trees or charging over the hill tops the main weakness of a tarp often becomes apparent and it submits to nature ... resulting in you laid under a flat tarp!

By their very nature, a tarp when erected will usually have at least one big, unsupported side or sail as it may as well be. We'll have plenty of pegging points around the edges but not much else. If we could support any sail like areas then we'd have a shelter that could take much more of a battering from the wind ... The answer is, tarp clips.


These two bits of plastic are fantastic. They work a little like a button, trapping the tarp between themselves and locking into position ... importantly, without damaging your tarp.


By either using the eyelets or just the outside edge you can add guy lines to your tarp, you can put them pretty much anywhere. Besides adding strength, if you place them correctly you can use the new guys as lifters to raise the sides of the tarp helping create more internal space ... cunning eh!


As if by magic, here's one I made earlier. There's two clips each side on this example, hopefully you can see what I mean about using the guys as lifters. You can get then in the UK from Ultralight Outdoor gear, follow the link below and it'll take you straight to them.


Saturday, February 19, 2011

Worlds lightest stove? ... possibly.

I saw something on the Internet this week that got me thinking about solid fuel stoves. Some of you'll remember firing up your Mamod steam engines as kids, using the little white solid fuel blocks ... no, just me then.

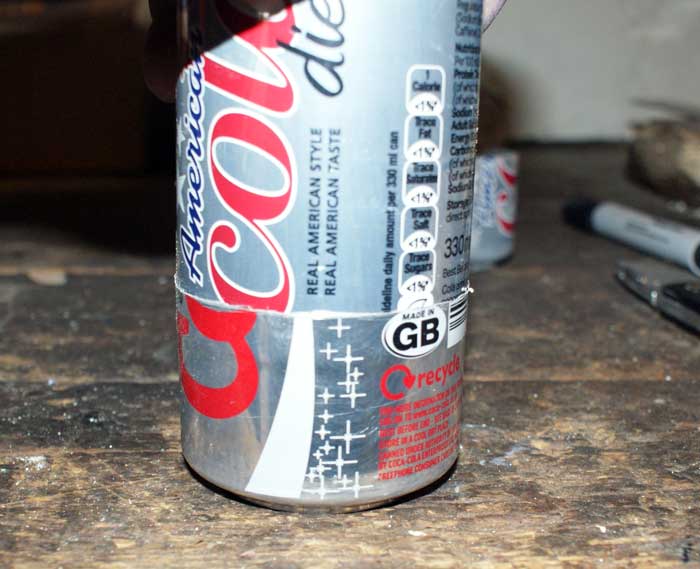
My knowledge of cooking with fuel tablets pretty much stops and starts in the same place ... don't bother, they take ages to warm water, let alone boil it. So, I never bothered, until today. Obviously the first thing required was a 'stove'. My thinking was, make the stove support the pan, contain the flame and concentrate the heat and try to minimise the effects of a breeze/wind. I set to work and 10 minutes and a couple of cans later I had a rough mark 1 stove. I put 2 fuel blocks in, lit them, waited a few seconds for them to get going, put my pan on ... and the flame dwindled to half the size. Stupidly I'd forgotten to put any sort of air gap at the top of the stove between it and the pan. I quickly remedied the matter with some tin snips and a piece of aluminium (as you can see in the picture). Once more the pan was placed on the stove, I checked the flame, it was the same size as it was prior the the pan going on ... all was well. I sat back and waited, and waited. 21 minutes and 47 seconds later I had half a litre of boiling water! I'd started to suffer the effects of tea withdrawal at around 14 minutes, so had nipped back in to put the kettle on anyway.

Point proved then ... that's why no one bothers with the things. I couldn't leave it there though. I'd obviously had plenty of time to stand and stare at the thing and I'd decided that the fuel block wasn't really burning as well as it could have. The conclusions I came to were, even though the stove had a large air hole, the air been drawn in wasn't fully reaching the rear of the stove. I also guessed that the pan wanted lifting above the stove (as I'd done with the cobbled aluminium ring) but the air gap wanted to extend over a greater percentage of the circumference. Armed with another cup of tea I had a little think. Perhaps Mark 1 was just too complicated, I needed to make everything as simple as possible.


You'll die of thirst first

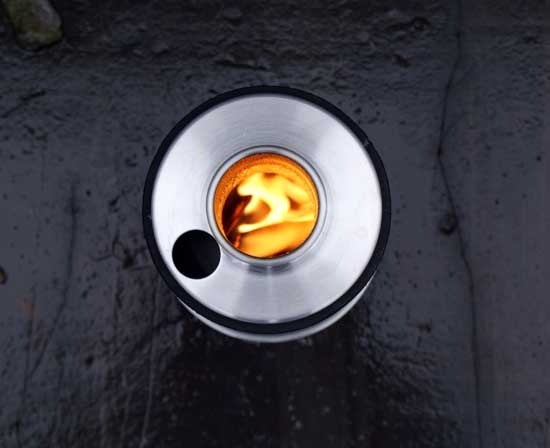
This is it, it doesn't get simpler. A base to hold the fuel block, 4 legs to support the pan and as much air from nearly every direction as the thing could ever need. As you can see from the picture, I put a fuel block in, lit it, then put my pan on top. I wasn't really expecting much to be honest ... possibly because it doesn't look like much.

To my surprise 7 minutes and 38 seconds later I had boiling water, proper boiling water, none of your little bubbles rubbish. It had just about used a complete block to achieve it but I was quite impressed. I was even more impressed when I realised that I'd possibly just built the worlds lightest stove ... that's right, the worlds lightest functional stove. I know there's a few titanium Esbit stoves out there but they're all over 5g ... this is just 3g and you could easily shave another off.


Oddly, it works

Thursday, February 17, 2011

Pop can stove ... part 2.

Our first job is the make the inner sleeve which will fit between the two can bottoms. We're going to use the split cylinder we lovingly made last time. The picture below should help a little.

A/ The circumference of the inside of the can (black line in can bottom) PLUS 30mm.
B/ The height of your tallest can bottom.

The lines with cut against them will hold the sleeve together. To measure them, pop your sleeve inside the can bottom, your aiming to get the sleeve to fit snugly into the lowest point (where the black lines are on the pic below). You'll find the ends of the sleeve will overlap ... use a pen to mark 10-15mm inboard of the over lap, mark it inside and out. Transfer the marks to one side and draw the lines ... half way down from the top for one and half way up from the bottom, for the other.


Once our lines are cut we need to add 3 or 4 notches to the bottom edge. Be as accurate as you want, it wont make any difference to how well the thing works! We should now have something that looks a bit like the picture below.


Roll it up and slot the two cuts together to form a cylinder ... as below. If you've loads of excess material on the join trim a bit off if you like.


I'm hoping that you haven't drunk your last full can just yet as we're going to need it. Use a full can (remember it has to be the same size) and CAREFULLY stretch ONE on your can bottoms. Don't go too mad or you'll either get them stuck or split the can bottom.


Doing well aren't we? ...This is the part that requires a little patience. First, put your inner sleeve into the stretched can bottom, with the notches you cut at the bottom. We now have to get the other can bottom to slide into the stretched one. It will be tight, you will get it in, apart from a tiny bit that won't behave itself. If you're struggling, cut yourself a shim from your scrap cans and use it like a shoe horn ... take your time, don't swear and be gentle. Once the two cans are lined up they should slide together fairly easily. Give 'em a good old squeeze and the end result should look something like below.


You did remember which way up it goes didn't you? ... the notches in the inner sleeve must be at the bottom. The picture below shows where we're going to cut to remove the TOP. I find that if you cut the crossed lines first, then score the outer circle you can often just break the quarters off.


The picture below shows the top removed and I've also cleaned up the outer edge ... don't feel you have to though. You can go as mad as you like tarting it up, file/grind it down, polish it or paint it ... whatever you like. You should also see some black dots, these are your potential jet locations. I've played around lots with sizes and location of jets and depending what your going to be cooking in these aren't bad. The upper dots, will produce flames that point more or less upwards, very good if your pot is a small diameter one, however you'll also need some kind of pan support, otherwise the pan will smoother the flames and put the stove out. The lower jet location will produce flames from the stove sides, so are more suited to a wide pan. In this configuration you can get away without an additional pan support too ... just sit your pan on top of the stove. Use a drawing/notice board pin to make the jet holes. Twist it like a drill and be careful not to push too far, you only want holes in the outer skin remember. I find that 8-12 jets works ok. Again be as precise or slap dash as you like with marking them out.


That's it, job done. Pour 20ml or so of meths in to your new pride and joy and fire it up. It'll take a couple of minutes to bloom but once it does it should look like this. Something to note - I've put two sets of jets in the stove below to try and show how the low and high jet locations will burn. Have fun!


Wednesday, February 16, 2011

Pop can stove ... part 1.

If you've decided to enter the slightly dark world of M.Y.O.G, then a pop can stove is a pretty good place to start. Do it right and it should last years (unless you stand on it), there's no moving parts to break, no jets to clog and nothing to wear out. We'll do this in a Blue Peter two part style. In part one we'll prepare our cans and in part two we'll assemble our collection of scrap aluminium in to a meths burning work of art.

The first thing you'll need is two cans, doesn't really matter what they are as long as they're the same, obviously something 'diet' will produce a lighter stove though. You'll need a sharp blade and a block of wood, book or anything else about 2" high that falls to hand ... when I say about, I do mean about ... we'll be making this with absolute minimum precision.


Start with this

The first job is to cut the bottoms off the cans. We need as 'clean' as cut as possible. If you go in there hacking and chopping then our cans won't become the butterfly we were hoping for and will remain the scruffy, hairy caterpillar for all time. This is where your blade and lump of whatever comes in. Rest the blade on your 2" high platform and LIGHTLY press the can against it and start to turn the can, keep turning (you should be able to hear the blade scratching the can) and keep turning. After what feels like far too long, your can should have a very pronounced scored line around the it.


Cut like this

Now, with the tip of your blade make a small incision on this score line. Using your thumb nail gently start to press down along the score line starting from the incision. You should find that the can splits very easily and you end up with the 'clean' cut we mentioned earlier. If the can tears or splits below the score line while your getting it apart ... put it in the bin, it's scrap. Start again with a new can and spend a little more time scoring, the deeper the scored line the easier the can will split.

I'm afraid you now need to do the same thing with your second can. This time however, either raise or lower your blade by a few mm (put a magazine under it?) ... the can bottoms want to be slightly different heights. If everything has gone to plan you should now have two can bottoms and two can tops. Put the bottoms to one side and find some scissors. Cut a line bottom to top on one of your can tops, then cut the whole top of the can off (the ring pull part). This should leave us with a split cylinder and our two can bottoms. Everything left can go in the recycling bin, we have what we need.


End up with this

We'll turn it in to a working stove next time, so you'll need, your blade, a pen, a drawing pin and a ruler ... you'll also require a FULL can, the same size as you've already used.

Tuesday, February 15, 2011

*Come on baby light my fire.

I introduced the MKettle a few weeks ago and have finally got round to testing it out ... read on and see how it turned out.


MKettle in full swing

Here we go then, a semi scientific MKettle test. Firstly I'd like to point out that it was windy and rainy but I stuck with it and did it out side rather than sneaking off in to the barn.

The first job was obviously finding something to burn. I hunted about and collected a small handfull of dead twigs. I didn't get them off the floor as they'd be fairly wet so I collected ones that had fallen in to some bushes ... surprisingly given the amount of rain we've had over the last few weeks they were still pretty dry. Next up I needed to get the twigs going, luckily the contents of my pockets never cease to amaze me ... 2 mini Haribo packets and an old route card later and we were ready.

I started the stop watch as I lit the fire. Once I could see that my assorted rubbish was alight I placed the kettle on to the fire pot and waited. It took about a minute for the fire to catch and I started to hear the twigs crackling. Looking down the centre of the kettle (or chimney as it is) revealed some nice flames, so I dropped a few more twigs down there and sat back.


View down the chimney after a couple of minutes

I'd filled the kettle with cold water taking care not to overfill it ... it held just under a pint, certainly enough for 2 proper sized brews or a brew and a dehydrated meal. At exactly 6 minutes and 30 seconds from putting a match to it I had a steady rolling boil. The neoprene sleeve on the kettle meant I could just lift it straight off with my bare hand, without the usual swearing that sometimes accompanies tea making.

The amount of wood required was surprising ... as it required very little, literally what you could bend down and pick up in one hand. I believe dead leaves, pine cones, bracken and pretty much anything else will work too.

I imagine pack size and weight will be the main concern for many ... so, my trusty scales and tape tell me that the kettle ready to go and including its rather smart bag weighs 375g. When you consider that a small gas cartridge when full weighs nearly 250g, then add the weight of the gas stove itself, plus a pan, the MKettle starts to look like a real contender. A really nice design touch is the fact that the fire pot sits inside the kettle when you're storing/transporting it but still leaves room for other bits and pieces in there too, important stuff like, tea bags. The overall dimensions when packed are 170mm x 110mm (or 6 3/4" x 7 3/4").

Something which may or may not concern you, is the fact that the entire kettle is made in the UK, every last bit, the bag, neoprene sleeve, even the medical grade stopper are all produced on home soil. If you fancy the idea of free fuel then follow the link over there > and get yourself a kettle or if you believe you're lucky then you might just win one at the WRT.

*Sorry for any Jim Morrison fans (see that I said for and not to)

Monday, February 14, 2011

T, T, S and S Part 2 ... Two worlds meet.

The two worlds in question are those of tents and tarps. It's very easy to imagine that by allowing tents and tarps to join forces the outcome would be a technical, over complicated disaster. A Frankenstein shelter that only carries the 'bad' genes from both parents and non of the good.

However, I'm glad to say that the union of tent and tarp has managed to produce a well balanced and pleasant offspring ... this bundle of fun was christened, Go-lite Shangrila 3 ... I know, I know, it's hardly Simon or Roger is it?

The Shangrila 3 is a single skin, tipi type shelter. One of the nice things about it is its slightly modular nature. In its basic form there is no floor but you can add a clip in bath tub style ground sheet if you wish. If it's midge season then a full mesh inner can be attached which includes a floor. If you're using it solo then a 'half hex floor' is available, so you sleep in one half and the other (without ground sheet) becomes your porch. It's marketed as a 3 person shelter and yes you can sleep 3 in there but it's very cosy. With 2 it's ideal and if you're alone you'll be rattling off the walls there's so much room.

Two large vents at the top combined with the fact air can get in underneath seem to cope with the potential single skin condensation issues pretty well. Any condensation which does form on the in side tends to run down the steep sides rather than dripping on you, which is obviously a big plus. If you're tall then the space in side should be most welcome, centre height is 160cm and the internal area is 5.5 sq/m.


Pitching couldn't be any easier or quicker, simply peg down each corner (6 pegs), climb in and push the telescopic aluminium pole into it's little reinforced seat, push up and that's it, your home for the night is erected (there's a ladder lock adjuster on each pegging point to adjust tension). It's surprising just what a battering it'll take before you realise that your prayers to the wind gods have gone unheard and it falls over ... Go-lite refer to it as 4 season which must say something. I think when you consider the potential it offers then weight seems pretty reasonable, the quoted figure is 1010g, mines seems to weigh a touch more at 1100g but that is including stuff sack, etc and a full compliment of spare Ti pegs. Even my figure of 1100g doesn't seem bad when you consider it really will sleep 2, you can sit up (hey, I can nearly stand up), cook, change clothes, etc. I think for multi day trips this might be one compromise that doesn't look like its been designed by a committee. It does what it sets out to do very well.

Wednesday, February 9, 2011

Need a lift from north Wales?

I've had a very kind offer from Mark. He says he'll be travelling down to the WRT from north Wales and if anyone would like a lift down, then he's your man. If you do require a lift then the easiest thing would be to email me stuart@forestfreeride.co.uk and I'll put you in touch with Mark.

Tuesday, February 8, 2011

Cold, wet feet?

Do you suffer with cold feet while in your sleeping bag? Do you want something to put on your feet while sat in your tent or swinging in your hammock? Are you tired of spending the evening in the same wet socks you've had on all day? ... if you answered yes to any of those questions and don't want to look like you're on a surf safari in flip flops, then here's a possible solution ... Nanok Sleep Socks. Here, you can see Dennis modeling a M/L pair which would fit anyone with feet from 9-13 (they're roomy). A smaller size is available, which should please Dennis as he gets 2 paws in 1 sock, which obviously isn't so good for walking.


The insulation is synthetic hollow fibre and the outer is ripstop Pertex, so whilst not waterproof they are water resistant ... and if they do get a little damp it won't be the end of the world. Now the important bit, a pair weigh in at just over 140g and will compress down to about the size of a small orange, so they're not going to be a massive burden to pack/carry. So far I've tried them down to around minus 4 and my feet were very, very toasty but not uncomfortable.

The quality appears good as does the price, online you should be able to pick a pair up for under £20. Nanok also produce a 'Bivi Boot' which is higher and has a true sole, so might be a little more suited to wondering around camp looking for all the stuff you 'put safe'... but obviously they'll be a bit heavier.

*Socks mine, sofa models own

Sunday, February 6, 2011

Coke can cheap V Titanium chic

So here we are then, 2 meths stoves, the first made from Coke cans and costing £0 whatsoever. The second constructed from titanium *by virgins in the low lying valleys of southern Tibet and costing around £25. Which one should you take on your next trip? Should you invest your money and go titanium or invest your time and slum it? ... lets find out.

I first (tried) to put 20ml of meths into each stove. Can stove was no trouble, the Vargo stove however would only hold 15ml before it started to look full, so we left it at that and carried on. I was interested to see how long each stove would take to 'bloom', once bloomed you can then start to cook but not before. From past experience, I knew the Vargo stove wasn't the quickest but I'd forgotten just how slow it was.

Coke can: Lighting to blooming 1min 37sec

Vargo: Lighting to blooming 4min 16sec


Next I wanted to see how long each stove would take to boil 450ml of cold water. The same pan was used each time, the pan was also fitted with a lid. I wanted to see a rolling boil not just little bubbles.

Coke can: 5min 16sec

Vargo: 6min

Now, I'm sure you're all finding this most interesting but what can we deduce from these riveting results. Well, firstly the Vargo stove is much more efficient. There was enough fuel in the stove after it had boiled the water, to boil another pan. The can stove on the other hand only just managed to bring the water to a rolling boil before running out of fuel (remember it also had more fuel to start with). It's also possible to blow the Vargo stove out when you've finished, something that's not as easy with the can stove. That is a bit of a double edged sword though ... you can conserve fuel by putting it out once you're done - bonus. If you're trying to cook somewhere breezy your stove keeps going out - not a bonus. The Vargo is also slower, not much in boiling time but when you add on the time it takes to bloom, then the can stove is almost twice as fast. Real world experience tells me that the big trouble with the Vargo is keeping it lit, it's not unusual to light it, let it bloom, start to cook and the next time you look its gone out. I have found that raising the pan a few mm above the inbuilt pan supports on the Vargo helps it to burn fiercer and stay lit more of the time. The can stove is pretty much the exact opposite, once it's going you'll have a hard time to stop it, until it runs out of fuel.

I'm not going to say that one stove is better than the other, they're just different. Each has pros and cons. The can stove is cheap and pretty fool proof but there is a certain something about the Vargo, you just need time to get to know it ... or perhaps I'm just trying to convince myself.

*This is a lie.

Can't resist ... sorry.

If anyone other than me has checked the answers to the polls over there >>> can you please try and explain to me how it can be that only one person is riding in a 'big, massive group'? ... I don't understand.

Friday, February 4, 2011

Tarps, tents, shelters and stuff ... part 1


I've been outside a lot today and it hasn't been nice. Low cloud and rain backed up by 60mph winds have made things pretty hard work ... including smiling. It did however get me thinking about what I'd choose to supply some shelter if I were out all night. Most of the time, if I'm looking to keep a bit of weather off I'd reach for a tarp. The size would depend upon whether I was on my own or not, whether there'd be any additional natural shelter (trees, etc) and what I was expecting weather wise. The smallest, lightest tarp I have is around 2m x 1m, weighs 200g and fits in the palm of your hand. On a summer evening, even with a little light rain expected this can be rigged to keep most of the elements at bay. It's only ever going to supply a simple roof, either as a lean to or set up with a ridge, so on a night like tonight it might be best left at home.

The next step up would obviously involve a bigger tarp. The picture below shows Taylors tarp (with Si under it). It's a 3m x 3.5m and set up as a ridge between the trees, pitched low to the ground and in a position to make the most of any natural shelter, would offer a surprising amount of protection ... it's also pretty spacious in there too, so great if you're not alone (or think you'll get lucky in the woods). On a trip just before Christmas a 3m x 4.5m tarp, rigged as a very simple roof covered 5 1/3 men (sorry Steve). The weight of that tarp was 800g, so while not light in the great scheme of things, it's actually very light for the space/protection it offers.


Returning back to tonight's weather, I might be looking for a little more protection though ... remember the wind driven rain. Well, a tarp can offer as much or as little protection as you want, just as long as you're willing to invest some time playing about. Once you do start thinking about folding rather than just tying, then you can knock up lots of interesting shapes and forms. The top picture is a 3m x 3m tarp, it hasn't been sewn into that shape only folded and pegged. It's enclosed on 3 sides, has a 'sewn in' groundsheet and a beak/porch for cooking and storage. If the weather really took a turn, the beak can be dropped almost to the ground, giving the happy camper inside almost total coverage. Total weight including, pegs, guys and pole is around 800g.

Tarps are always going to be something of an acquired taste. Some people will point out you can get an ultralight tent that weighs the same and that's true, but ... you can't get one that packs as small, is as quick to pitch and strike and then there's the problem of the ultralight tent costing you around 4 times as much ... origami, it's the future!

Thursday, February 3, 2011

The Postman always rings twice.

And I'm sure he does for some people but here it's more likely he'll pull in the yard beeping his horn. He's great *Gwyn the postie and he was even greater today because he brought me a box containing shiny things ... shiny things that make tea, so that was even better!


What we have here is an MKettle. Some of you will be familiar with Kelly Kettles, well the MKettle works on the same principle but the design has been brought bang up to date. Very importantly, it's also been designed with the lightweight market in mind. I haven't had chance to try it out but over the next few days I'll put it through it paces and report back. I have to say, if the performance is as good as the quality then it'll be a winner.

*But not as pretty as the other one who sometimes comes.

Wednesday, February 2, 2011

Entry forms have left the building!

If you emailed and asked to be put on 'the list' then you should have now received an email containing your pdf entry form ... the covering email should make everything clear.

If you emailed but haven't received an entry form and have checked your spam folder, let me know and I'll send it again.

If you haven't emailed with a request to be added to 'the list' then pull your finger out and do it now, otherwise the 2011 WRT will forever be a 'what if' moment in your life!

Tuesday, February 1, 2011

Bikepacking UK on Facebook.

I have to admit that I don't really get the whole Facebook and Twitter type thing ... think that might just be me though, afterall I don't have a telly. However, lots of other people obviously do get it and one of those is Andrew. Andrew wants me to let you know that he's set up a Facebook page (or should that be group?) entitled Bikepacking UK. So, pop over and take a look, there's some WRT stuff on there already for those who can't get enough and if you're lucky you might just meet the women/man of your dreams ... or so the ads down the right hand side of the page tell me!